Scenes
A scene is a single screen of your game, it can contain multiple actors and triggers. A game is typically made-up of many scenes connected together with triggers using the Change Scene event.
Adding a Scene
Click the + button in the Editor Tools and select Scene from the menu. Click on any empty space in the Project Viewport to place the new scene.
You can use the Editor Sidebar to give your scene a name and a background from your project's assets. See the documentation for Backgrounds for more information on adding background images.
Scene Properties
- Name - Names your scene. Useful for locating your scene with the search bar and scene navigator.
Using / characters in your scene's name will cause it to appear within folders in the scene navigator (e.g. ui/title screen will appear as title screen within the ui folder)
-
Type - Lets you choose from the list of game modes such as Top Down 2D or Platformer. This option changes how the scene plays while in game. Using plugins it's possible to add additional scene types here and modify the inbuilt types.
-
Background - Lets you choose a background image from the
assets/backgroundsfolder. Optionally allows extracting the color palettes automatically for color .png images. -
Background Palettes (Color Modes Only) - The eight palettes that will be used when colorizing the scene.
-
Sprite Palettes (Color Modes Only) - The eight palettes that will be used for sprites in your scene.
-
Player Sprite Sheet - Used to set a custom player sprite for this scene. By default the scene will use the default player sprite for the selected scene type.
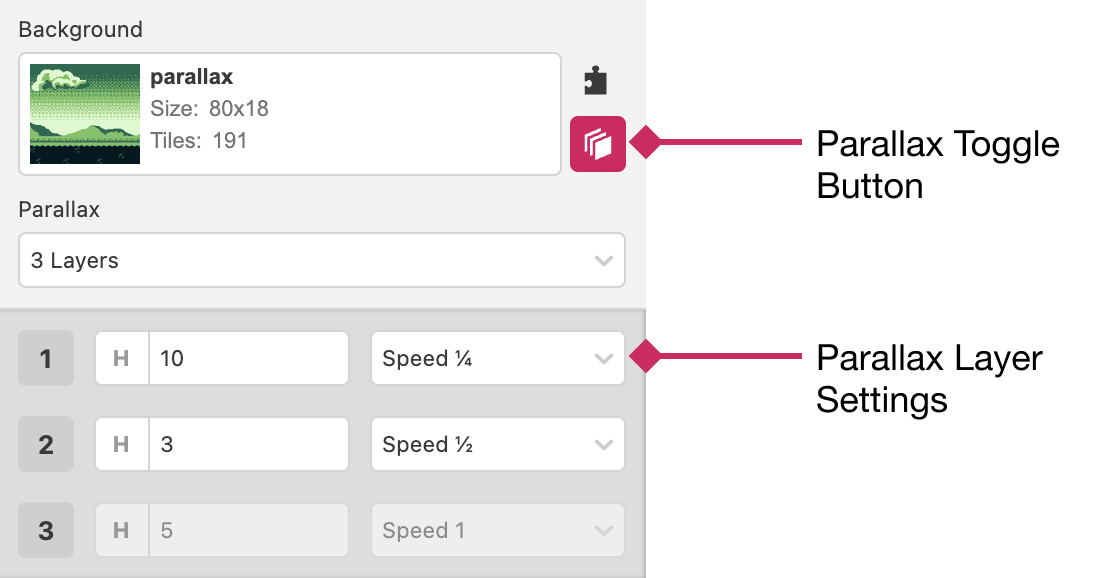
Parallax Mode
Clicking the Parallax Toggle Button to the right of the Background Selector allows you to turn on parallax mode for the scene. When parallax mode is enabled you can split the background into up to three slices which can be modified to scroll at different speeds as the camera moves in game.
Common Tilesets
This is an advanced technique that may require an understanding of how graphics memory is located and loaded in your game.
When using the Change Scene event with Fade Speed set to Instant you'll often see "glitchy" graphics as you move to the next scene. This is because there is slight delay loading tile data and for a small period of time the scene will show the previous scene's tile data using the new scene's layout. To confirm this you can use the VRAM panel in the Debugger.
To help fix this problem you can specify a tileset that is shared between the two scenes. Tilesets are images from the assets/tilesets folder. When two scenes share a common tileset, the common tiles will always be loaded in the same locations in memory allowing more seamless transitions.
e.g. these two scenes have the same common tileset
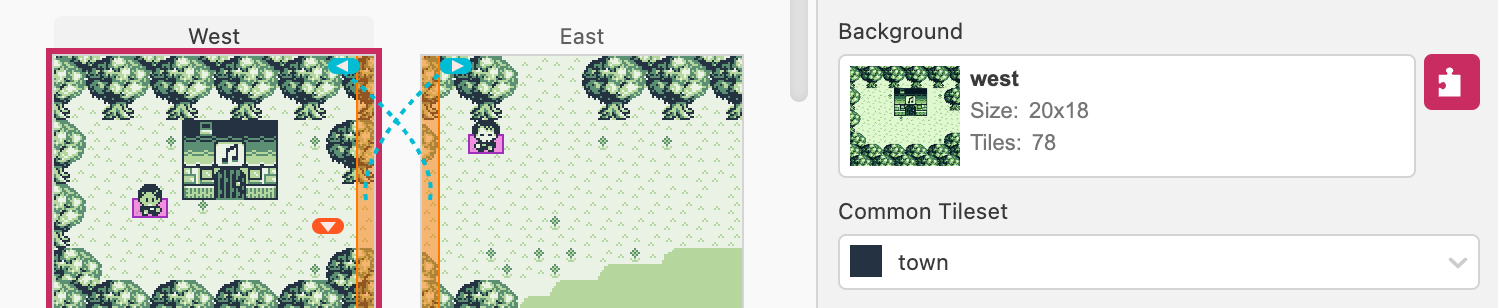
which allows instantly switching between them
The assets used in this example are:
Notice how the tileset image doesn't need to only contain unique tiles (although it can if you'd prefer), when running your game only the unique tiles found in the image will be loaded.
Scripting
Scenes can contain an On Init script that will be called as soon as the scene is loaded in game. You can use this to do things like playing music as the scene loads, configuring events to happen on button presses, initialise actors based on the values of variables, and much more.
You can also define scripts to call when the player collides with Actors that have a Collision Group set by clicking the On Hit tab and choose a collision group.
To start building a script, select a scene, click the script type you want to edit and click the Add Event button in the Editor Sidebar to open the event menu. Select an event to add it to the script.
For more information see the documentation for Scripting.
Adding Collision to a Scene
Select the Collision Tool from the Editor Tools. There are 6 default collision types that can be added.
- Solid Stops colliding actors from entering the tile on any side.
- Top/Bottom/Left/Right Stops colliding actors from entering the tile from that specific side. This is useful for one-way collision and semi-solid platforms.
- Ladder (Platformer only) Allows moving up and down in Platformer scenes.
Each tile can hold a maximum of 1 ladder and 3 collision sides. Adding 4 collision sides will replace the sides with a single solid block. Ladders will not replace existing collision when placed on top of another collision.
Additionally there is a dropdown menu allowing you view additional tiles:
- Slope Tiles - These tiles can be used to add slopes to your scene (Platformer only), you might find it easier to use the Slope Brush instead rather than placing these tiles manually
- Extra Tiles - These tiles are currently unused by GB Studio and may be given a purpose at some point in the future, you may place them now and modify your game engine to use them but this may prevent you from moving your project to newer GB Studio versions.
Drawing Slopes
The Slope Brush is a quick way to add slope collisions to your scenes (Platformer only). With the brush selected click on the starting tile and drag to one tile after where you want the slope to be placed. When placing a shallow slope you can hold Shift while dragging to offset the slope vertically.
It's also possible to use this tool to draw horizontal and vertical collisions by holding Ctrl while dragging. When dragging left to right you will create a Top collision, right to left creates a Bottom collision, top to bottom creates a Left collision and bottom to top creates a Right collision. Holding Ctrl + Shift will flip the collision direction (Top will become Bottom etc).
Colorizing a Scene
Select the Colorizer Tool from the Editor Tools. There are 8 palettes types that can be added to a scene with Color Mode enabled. Palettes can be adjusted in Settings. Note that the 8th palette in a scene will also be used for Dialogue Windows and menus.
The palettes used in the Colorizer Tool can be swapped out for existing palettes (such as the UI palette) by long-clicking on a palette.
For more information about the drawing mode used for the Colorize Tool and the Collision Tool, see Keyboard Shortcuts.
Automatic Color
If your image is already a color .png file you can try switching to using Automatic Background Palettes using the Editor Sidebar.
You will need to be careful to follow the same requirements about unique colors per scene and tile when using Automatic Background Palettes if you want your images to display correctly. For example, using more than 7 unique color palettes will cause palette 8 to be overwritten meaning dialogue and menu windows may not appear correctly for that scene.
When using Automatic Background Palettes, Monochrome tiles are also created automatically. If you want to support both Color and Monochrome devices you may want to provide a Monochrome Override image to give more control how the background appears on Monochrome devices.
Tile Priority
When colorizing a scene you can use the <!> button to set priority tiles, these tiles will appear in front of actors (on GB Color games only) allowing you to create depth in your scenes. Note that the first color in the tile's palette will be transparent and drawn behind the actors.

Magic Brush
The Magic Brush is available when adding collisions or colorizing a scene and can be used to paint every tile in the scene that matches the one you clicked instantly.
Scene Limits
There are several limits that GB Studio has put in place to keep game performance consistent, and to minimize visual issues.
Each scene can have a maxmimum of 20 actors, and 30 triggers, and between 192 and 64 sprite tiles depending on project settings and the complexity of the background used. You can check this information by selecting a scene and looking for the gray bar under your scene that reads: A: 0/20 S: 0/96 T: 0/30. The letters on this bar represent the following:
A:represents the number of actors that the scene is using.S:represents the number of unique sprite tiles that each actor is using in their sprite sheet.T:represents the number of triggers that the scene is using.
Actor Limits
Each scene can have a maximum of 20 actors. Ideally, there should never be more than 10 actors within a 20 x 18 tile boundary, equivalent to 160px x 144px. Clustering more than 10 actors together in a scene will cause some actors to become invisible in-game. GB Studio will warn you if it thinks this will be the case for a scene:

You can address this message by moving or deleting actors so no more than 10 will be seen in a 20 x 18 tile boundary. You can use the Eraser Tool to delete actors. Actors will still become invisible if more than 10 actors move into the screenspace after the scene starts.
Trigger Limits
Each scene can have a maximum of 30 triggers. You can use the Eraser Tool to delete triggers.
Backround and Sprite Tile Limits
The memory limits for background and sprite tiles depend on whether your game's color mode is set to Color Only. In Color Only mode, approximately twice the amount of memory is available for tile data, but the game will not run on non-color devices. You can set the color mode from the Settings section.
You can use the VRAM panel in the Debugger to get a visual representation of how tiles are being used in each scene in your game.
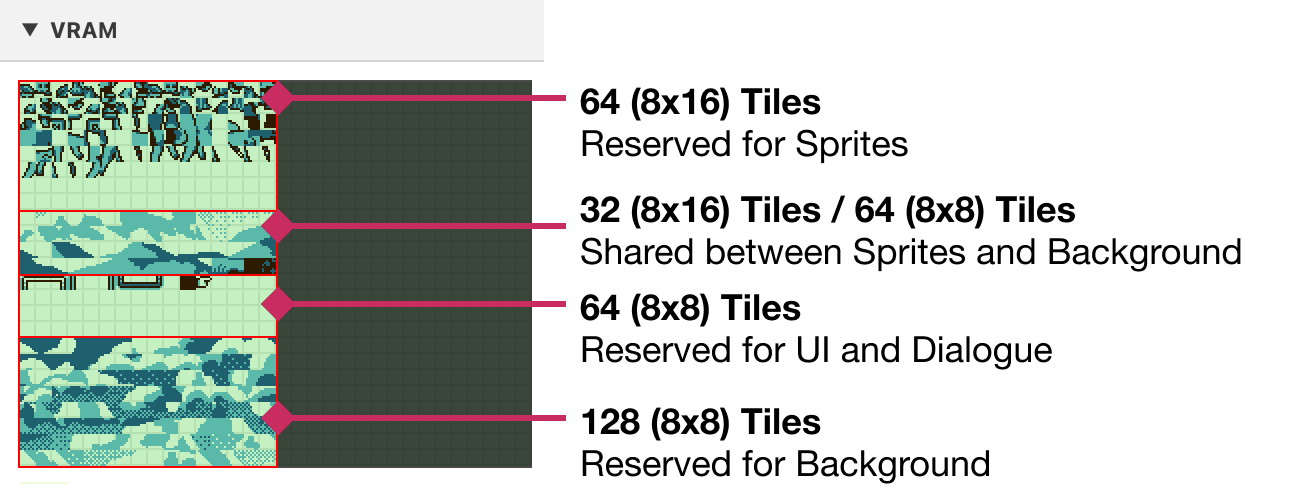
"Monochrome" and "Color + Monochrome" Games
When your game's color mode is set to either Monochrome or Color + Monochrome the following limits will be used:
- 64 Tiles reserved for Sprites
- 128 Tiles reserved for Background
- 64 Tiles reserved for UI
- 64 Tiles shared between Sprites and Background. The more complex your background is, the less tiles will be available for use by sprites. Note that as sprites use 8x16 sized tiles this shared area is shown as 32 sprite tiles.
If your background uses 128 tiles or fewer, you can use up to 96 sprite tiles (64 reserved + 32 shared). However, if your background uses all 192 tiles, you will only be able to use 64 sprite tiles.
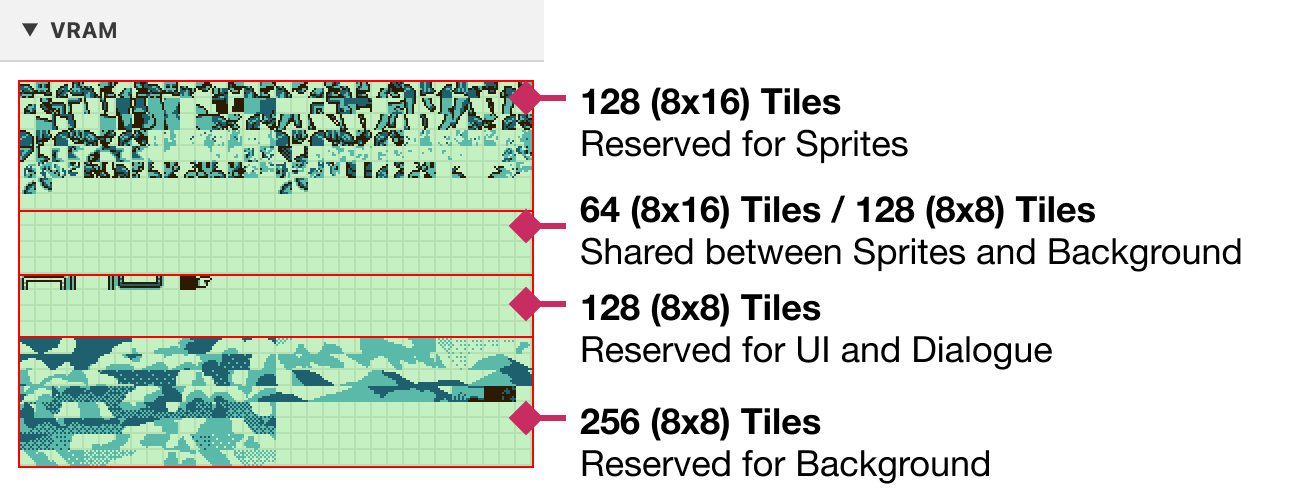
"Color Only" Games
When your game's color mode is set to either Color Only, the following increased limits will be used:
- 128 Tiles reserved for Sprites
- 256 Tiles reserved for Background
- 128 Tiles reserved for UI
- 128 Tiles shared between Sprites and Background. The more complex your background is, the less tiles will be available for use by sprites. Note that as sprites use 8x16 sized tiles this shared area is shown as 64 sprite tiles.
If your background uses 256 tiles or fewer, you can use up to 192 sprite tiles (128 reserved + 64 shared). However, if your background uses all 384 tiles, you will only be able to use 128 sprite tiles.